Wednesday, March 12, 2008

Longing for Fall..

I know, I know -- as all of you out there long for the snow to melt and spring to be in full-swing, this crazy girl can't wait until fall. Instead of breaking out the flipflops, I daydream about hosting our first "big" Thanksgiving dinner, leaves changing colors, watching my brother play college football, and all things pumpkin. Therefore, in the spirit of these daydreams --


Whole Wheat Pumpkin Bread
1/2 cup applesauce (or canola oil if you're not into the moist, healthi(er) option ;)
1 1/4 cups canned pumpkin (NOT pumpkin pie filling)
1 cup white sugar
1/3 cup brown sugar
2 eggs (room temperature)
1-1/2 cups all-purpose flour
1/2 tsp baking soda
1/2 tsp baking powder
1/2 tsp salt
1 tsp cinnamon
1/4 tsp ground cloves
1/2 tsp ground nutmeg
1/2 cup toasted chopped nuts (optional, like pecans or walnuts)
1/2 cup raisins (optional)

Preheat the oven to 350 degrees

Lightly spray a loaf pan with cooking spray (or grease and flour)

In a large bowl whisk together the flour, baking soda, baking powder, salt, cinnamon, cloves and nutmeg. Set aside.

In a medium size mixing bowl, mix together the applesauce, pumpkin, sugar, brown sugar and eggs until combined. Carefully mix in the flour mixture and stir until well blended. (fold in nuts and raisins, if using)

Gently pour and spread the batter evenly into prepared loaf pan.

Bake in preheated oven for 40-60 minutes or until the top of the loaf springs back slightly when gently pressed. Cool in pan for 10-20 minutes and transfer to rack to cool completely.

Tuesday, March 11, 2008

COTF Calzones

We have visitors coming next week -- that's right folks, the absolute population of Yumstown is about to double! This calls for a "Clean-Out-the-Fridge" (COFT) meal, undoubtedly to make room for wine, beer, and more exciting food than leftover marinara.. 1/2 a tomato.. a handful of mushrooms...etc.

Usually, these meals consist of a mini-buffet of these bits-and-pieces -- but somehow the combination of me having an afternoon off, co
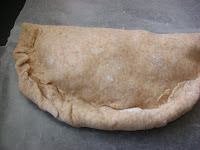
upled with the intriguing mishmash of randomness in the fridge and my recent interest in working with yeast yielded these whole-wheat calzones -- five of which I froze for future baking, and one (see below).. that we immediately devoured..


Calzones with Whole-Wheat Dough
Ingredients:

1 teaspoon white sugar
1 1/2 cup warm water
1 tablespoon active dry yeast (1 used one packet, which is a little less than 1 Tbsp)
1 tablespoon olive oil
1 teaspoon salt
2 cups whole wheat flour
1 1/2 cup all-purpose flour

In a large bowl (I used my KitchenAid mixer bowl), dissolve sugar in warm water. Sprinkle yeast over the top, and let stand for about 10 minutes, until foamy. Stir in olive oil and salt, then add the whole wheat flour and 1 cup of the all-purpose flour until dough starts to come together. Either knead 10 minutes by hand, or use the dough-hook on a mixer and knead until the ball of dough becomes smooth.

Place dough in a bowl sprayed with cooking spray, and turn once to coat the dough. Cover loosely with a towel, and let stand in a warm place until doubled in size, about 1 hour.

When the dough has doubled, divide into 6 equally-sized balls. Let rise again for about 45 minutes, until doubled.

Roll each ball of dough with a rolling pin into a circle. Roll until dough will not stretch any further. Place fillings (see below for ideas) on 1/2 of the circle. Fold remaining dough over top of fillings to create a half-circle. Pinch edges of dough together.

To cook immediately: Preheat oven to 425 degrees. Bake for 10-12 minutes in preheated oven, until the crust is crisp and golden at the edges. Serve with marinara on the side for dipping.

To freeze: Place calzone on waxed paper. Wrap loosely, place inside freezer bag (I use 1 quart Ziplock bags) Label bag with fillings and directions on cooking. Freeze. To eat, thaw fully before cooking.

Whole-Wheat Dough Recipe adapted from CDKitchen

Filling ideas:
  • Sausage, mushrooms and mozzarella, marinara sauce
  • Deli ham, honey mustard, spinach, cheddar cheese
  • Deli turkey, spinach, mozzarella, dried cranberries
  • Cooked chicken, spinach, sun-dried tomatoes
  • Ricotta cheese, spinach
  • Any other sauces, cheese, vegetables or meat -- be creative!

Wednesday, March 5, 2008

Banana Chocolate-Chip Biscotti

If a food has the name banana in the title, I'm likely to try it -- enter the "banana/turkey meatloaf disaster"...sigh... nonetheless, while perusing the menu of a local bakery, I got the idea to try replicating a banana-flavored biscotti and I'm still patting myself on the back. MMmmm. Of course they're great with coffee or tea, however I found myself snacking on them throughout the day like cookies!


Banana Chocolate-Chip Biscotti
1 cup sugar
1/2 cup butter or margarine, softened
1/2 cup mashed very ripe banana (about 1 medium-sized banana)
1 teaspoon vanilla extract

2 eggs (at room temperature)
3 cups all-purpose flour (not self-rising)
3 teaspoons baking powder
1/4 teaspoon salt
1/2 cup miniature semisweet chocolate chips

Preheat oven to 350 degrees. Grease large cookie sheet

Stir flo
ur, baking powder, and salt together in small bowl. Set aside.

Beat sugar and butter
in large bowl on medium speed. Beat in banana, vanilla and eggs until smooth. Stir in flour-mixture until well-combined. Then stir in chocolate chips.

Divide dough
in half --shape each half into a long rectangle on the greased cookie sheet. (dough will be sticky, greasing your hands might help)

Bake about 25 minutes or until toothpick inserted in center comes out clean. Remove from oven and cool 15 minutes on cookie sheet.


Cut crosswise through the biscotti-log to make about 32 one-half inch thick slices. Lay slices cut-side down on cookie sheet, bake 10-12 minutes or until the top is golden brown and dry; turn slices and bake about 10 minutes longer until golden brown. Remove from oven; cool biscotti on wire rack.


Things I will try next time:
  • Dipping one end in melted chocolate
  • Adding some chopped pecans or walnuts

Bye, Bye Deep Fry!


It started with a discussion about Mexican restaurants... progressed into a general craving for Mexican food... and ended up a full out NEED for a crispy, crunchy, fresh taco salad.

My general dislike for salty, greasy tortilla chips led me away from purchasing ready-made taco salad shells, and I entered the trial-and-error process of homemade shells. It must be said that a small number of tortillas were harmed in this experiment -- some too crispy , some too soggy -- but at long last yielded a perfectly proportioned taco salad shell.

Best of all, these shells are incredibly simple! All that you need is an oven safe custard dish, empty soup can, or ball of aluminum foil.

Homemade Taco Salad Shells

Preheat oven to 450 degrees (hot, hot, hot!)

Line a cookie sheet with aluminum foil, then place one can or aluminum foil ball or custard dish on the sheet for each shell you intend to make.

Brush torillas on each side with a small amount of water, followed by a generous spray of cooking spray or olive oil.

Drape shells over soup cans.

Bake the shells until they hold their shape (about 4-5 minutes), then remove the cans and invert the shells "right side up" on the cookie sheet. Bake an additional 2-3 minutes. Remove from oven and allow to cool before adding salad components.

Fill with shredded lettuce, chopped tomatoes, black olives, cheese, taco meat, sour cream, jalapenos, and taco sauce or salsa. Enjoy!

Springtime Asparagus

Flashback 4 Years:
Setting: Williams Sonoma store in Milwaukee, WI
Characters: 2 college students, living in ridiculously small studio apartment.

Issac: "What is this?"
Nicole: "Its a pot for steaming asparagus"
Issac: "Well, I guess we'll really know we've 'made it' when we have a pot especially for asparagus"
--------------------------------------------------------------------------------------------
Flashback 2 Years:
Setting: Couples wedding shower in Duluth, MN

Issac: (tearing open package) "WE DID IT, BUDDY! WE'RE REALLY ADULTS NOW!!"

So -- from one adult to another, I share with you one of our favorite uses for our beloved asparagus pot.

Springtime Asparagus

Ingredients:
1 pound thick-stalk asparagus
2 Tablespoons olive oil
1 teaspoon red-wine vinegar
1 teaspoon dijon mustard
2-3 green onions, sliced thinly (or 1 small shallot, thinly sliced)
freshly ground black pepper

Fill bottom of asparagus pot with water. Bring to boil. Wash and trim asparagus so that they fit into the basket and the cover can be placed firmly on top of the pot. Once water is boiling, place basket into pot, cover. Steam until thickest part of stem is cooked through, but asparagus still holds its form. Drain and place asparagus on a platter.


While steaming, mix the vinegar and mustard with a whisk in a small bowl. Slowly whisk in the olive oil, forming an emulsion. Drizzle over asparagus. Sprinkle with sliced green onions and black pepper. Cover with plastic wrap and allow to chill at least 1-2 hours before serving.


Serve cold.

Note: in our years without an asparagus pot, we steamed our asparagus in the microwave using a 8x8 pyrex pan with a little water on the bottom and a tightly fitting plastic wrap.

Yum Cake: A Lemonless Poppyseed Delight

Disclaimer: I do not like cake. Therefore, my gushing about the following decadent treat is probably underestimated. I think its fantastic, which probably means that in reality, it's even better than that.

When a coworker brought this cake into work on her birthday, it felt like it was everyone's birthday -- we all got the gift of trying this amazing and beautifully simple treat! Moist and mouthwatering and scrumptious, oh my!

...and we here in Yumstown are all about sharing the love; therefore, I present to you ..


Yum Cake (aka: Poppy Seed Bundt Cake)
1 (18 oz) package Yellow cake mix (I always search for the "extra moist" or "pudding" version)
1 cup vegetable oil
1 cup light sour cream
1/4 cup poppy seeds
1/2 cup white sugar
4 eggs (or egg substitute)
Combine cake mix, oil, sour cream, poppy seeds and sugar. Beat until smooth.

Beat in eggs one at a time. Pour batter into greased and sugared bundt pan. (this part is
important, if the pan is not greased and sugared, the cake will NOT come out clean)

Bake at 325 degrees for 60 minutes

Should you choose to add to the wonderful-ness of this cake, a simple glaze drizzled over the cake as it is cooling is a nice finish. I started with two cups of powdered confectioner's sugar and a tablespoon or two of milk. Mix until glaze is of desired consistency, adding milk as necessary. Drizzle finished product over your Yum Cake.


Saturday, March 1, 2008

The Black Sheep of Wisconsin


I'm still trying to decide if I'm witty enough to have my own food blog.
Or tech-savvy enough.
Or if my camera can hack it.
But food.. ahhh, food!!
Cooking.. baking... entertaining, now these things I enjoy!

While others get excited about shopping for clothes or jewelry, I hear new restaurants calling my name and dream of the day I live within an hour's drive of a Trader Joe's. Growing up in a traditional Midwestern "Meat and Potatoes" home, somehow I emerged as a vegetable-loving, seafood-eating carbo-phile. I like to joke that I'm the Black Sheep of Wisconsin -- I'm as proud of the Green and Gold as any Cheesehead, though I can't stomach a bratwurst to save my life.. beer makes me crinkle my nose.. and my idea of cheese is not cheddar, but gorgonzola, feta, or bleu.

Things you won't see here:
  • Eggs (in the form of breakfast food) : I burn them, and generally am not a fan of being up early enough to eat them
  • Red meats : A good venison dish on occasion, but overall we roll more with the white meat
  • Fondant: Not yet, anyway. I'm still not quite sure how to pronounce it.